Wednesday, April 29, 2020

Part 1 : Using Jenkins to build .Net Core Solutions/Projects


This is a walk through on how to setup a Jenkins project to build a .Net Core application on a windows 10 machine. The .Net code has its source code stored on  GitHub.

Install and setup Jenkins on windows 10

In this step you will download, install and setup Jenkins on your Win 10 operating system.

  1. Download Jenkins by going to this url
    https://www.jenkins.io/download/ then scroll down to the  below table and click on windows.

  2. You should have a zip file like below. After downloading it, unzip it and follow the installation prompts. This is pretty straight forward.

  3. Once the setup is complete you can load it in your browser by going to this url below.

    http://localhost:8080/
  4. You will be presented with a login screen and you will need the initial admin password. You can find this in your Jenkins installation folder. Look for the initialAdminPassword in the secrets folder like below.

    C:\Program Files (x86)\Jenkins\secrets\initialAdminPassword
  5. Once you have signed into Jenkins you can change your password. Strongly recommend you do that as a security precaution. 

Adding Plugins


In this step you will learn how to install the MSBuild plugin and configure the plugin.

  1. Once on the main page of Jenkin's you will need to navigate to  Manage Jenkins in the left hand navigation. 
  2. Then click on Manage Plugins like below.


  3. Then click on the Available tab. 
  4. Check the MSBuild checkbox under .NET Development.

  5. Scroll down and click on "Download now and install after restart". 
  6. Click on Manage Jenkins in the left hand navigation. 
  7. Then click on Global Tool Configuration.

  8. Scroll down to MSBuild and click on Add MSBuild 
  9. Give it a name E.g. VSBuild. 
  10. Set the path to your MSBuild executable in the Path to MSBuild field. This will be located in the folder below if you have Visual studio installed. Alternatively you could download the .Net framework and locate the MSBuild executable path in the .Net installation folder. It's important to note that the MSBuild.exe is required even though there is a warning that its only expecting a folder path.C:\Program Files (x86)\Microsoft Visual Studio\2019\Community\MSBuild\Current\Bin\Msbuild.exe

  11. Scroll down and click Apply and Save

Creating your first Jenkins project

In this step you will learn how to setup a Jenkins project to build a .Net Core application.
  1. Click on the New Item in the  left hand navigation. 
  2. Enter an item name and select Freestyle project. 
  3. Scroll down and click OK. 
  4. Under Source Code Management choose GIT.


  5. Enter the GIT repo url in Repository URL. Based on the type of repository you may need to provide appropriate credentials. 
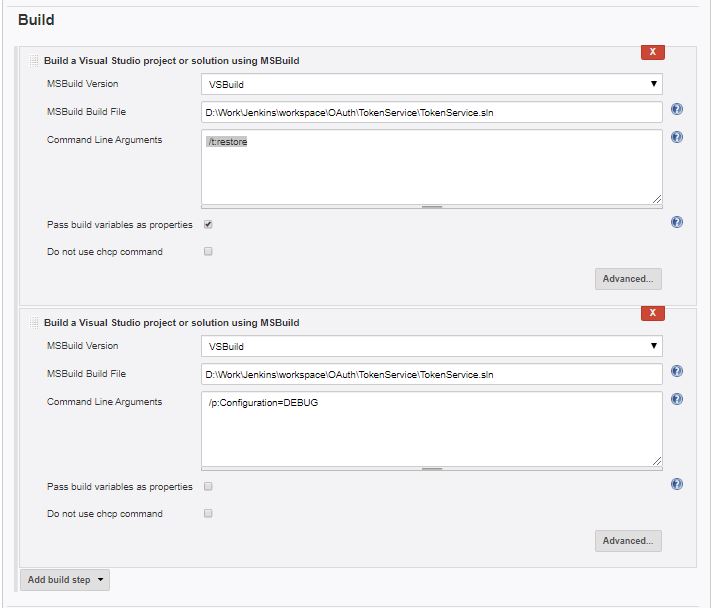
  6. Scroll down to Build and click on Add build step.
  7. Choose the MSBuild Version you setup in Jenkin setup above Choose the MSBuild Build File as a full path to the Solution/Project file.
  8. For Command Line Arguments add /p:Configuration=DEBUG or /p:Configuration=RELEASE depending on what you intend to build. 


** If you are not checking in the project assets like me. This is part of the .gitignore by default, you will need an additional
build step to restore them. 


  1. Click on Add build step.
  2. Choose the MSBuild Version you setup in Jenkin setup above.
  3. Choose the MSBuild Build File as a full path to the Solution/Project file.
  4. For Command Line Arguments add /t:restore.
Build your project

In this step you obtain Nirvana when you get to build your project.

  1. Click on the name of your project. 
  2. Then click on  Build Now in the left hand side.


  3. You should see your project build status now.


Tuesday, June 18, 2013

MVC Custom Model Binder

Recently I was looking at an unusual problem where we had to add custom fields to a view on an ad hoc basis. Not really a problem if it was an MVC app talking directly to a data source. But mine was over several REST based services that were talking to a CRM dynamics backend, spread across multiple domains. Which meant we had to change the data models through out the system. That's when it occurred to  me that we can have one dedicated field  that can store all the ad hoc field data using JASON or xml and we append it to one of the existing fields. Probably not the ideal solution, but that's when I came across custom binding for MVC. I would like to share with you how simple and easy it is to use custom binding to solve similar issues.

See here for more http://www.codeproject.com/Articles/605595/ASP-NET-MVC-Custom-Model-Binder?msg=4591496#xx4591496xx

Friday, February 10, 2012

The Adapter Pattern


The adapter pattern is used to match one interface with another. This is a useful pattern to use when implementing Interface Segregation Principles.

Problem  

I'm building a digital simulator called FarmAnimals that can build farm animals with many capabilities. Some of these capabilities I wish to implement on my own and for others Id like to use an external source like a library. I have found a library called ZooLib that offers animal capabilities that I'd like to use. But the ZooLib library classes implement an interface that is very different to the one implemented by my classes in FarmAnimals. Thankfully there's an Adapter pattern to  the rescue!

Analysis 

I've decided to create a Goat using my FarmAnimals application. FarmAnimals contains an Interface 
IFarmAnimal which defines a method called getDietaryType(). All animals need to eat is a given and so I expect all my animal classes to implement IFarmAnimal.

The ZooLib library has a useful function getFamily() that can help identify the family my animals belong to. I want to use  this feature in FarmAnimals. But my Goat class implements an IFarmAnimal interface and the getFamily which is part of the MountainGoat class in ZooAnimals implements an interface called IZooAnimals which is a completely different interface.

Solution 

Create an abstract base class called ZooAnimalAdapter that implements both interfaces. It delegates all my IFarmAnimal operations to the concrete subclasses in this case Goat and builds wrappers around the IFarmAnimal which are also available as part of my Goat class.

Code


Contents of the ZooLib library

public interface IZooAnimal
{
    void getFamily();
}

public class MountainGoat : IZooAnimal
{
    public void getFamily()
    {
        Console.WriteLine("Family : Bovidae");
    }
}

Contents of my FarmAnimal application

public interface IFarmAnimal
{
   void getDietaryType();
}


public abstract class ZooAnimalAdapter:IFarmAnimal,IZooAnimal
{
   public abstract void getDietaryType();
   public void getFamily()
   {
      IZooAnimal za = new MountainGoat();
      za.getFamily();
   }
}

public class Goat: ZooAnimalAdapter
{
   public void getDietaryType()
   {
      Console.WriteLine("Diet: Herbivor");
   }
}
public class Program
{
   static void Main(string[] args)
   {
       Goat g = new Goat();
       g.getFamily();
       g.getDietaryType();
       Console.ReadKey();
   }
}