Saturday, May 09, 2020

APS.Net Core Dependency Injection


ASP.Net Core has a built-in dependency framework. This means you don't need to write your own plumbing code to achieve Dependency Injection. ASP.Net Core helps enforces the Dependency Injection Principle out of the box.   


What is a dependency?


Dependency is established between classes when one class needs another class to fulfil its functionality. Below are two classes class A and class B. Class A needs class B to accomplish the addition functionality. So class A has a dependency on class B or class A is dependent on class B.

class A{

    public int addition(int x, int y)
    {
        B objB = new B();
        return objB(x,y);
    }
}

While this is a perfectly viable situation to do, it makes class A very tightly coupled with class B. To further elaborate on this, imagine you discovered a faster algorithm in class C. You would now have to rewrite class A, remove the dependency on B and use C instead. While this doesn't seem difficult to do in their example it may not be the same if this dependency has been used in several places throughout your code. 


Dependency injection


Is there a better way to manage a dependency? Yes there is and its called Dependency Injection. Instead of letting class A manage the creation of class B, we delegate this responsibility to the class calling class A and then injecting that object into class A when required.  


class A{

    private B _objB;

    public A(B objB)
    {
        _objB = objB;
    }

    public int addition(int x, int y)
    {
        return _objB(x,y);
    }
}


class Program{

     public static void main(string args[])
     {
          B objB = new B();
          A objA = new A(objB);
          Console.WriteLine(obja.addition(4,5).ToString());
     }
}

Dependency injection in ASP.Core


ASP.Core has introduced a dependency injection container in the form of a ConfigureServices method in the Startup classLet's walk this through by creating and registering a service called MyService.


Step1: Create an interface for our service called IMyService.

interface IMyService{
     public void GetMyUsers();
}

Step2: Create a service called MyService that implements interface IMyService.

public class MyService: IMyService{
   
     public void GetMyUsers(){
         //****Do something here *****
     }
}

Step3: Next we register MyService in the ConfigureServices method of the Startup class. We do this by using one of the three methods services.AddTransient, services.AddScoped and services.AddSingleton provided by IServiceCollection. For more information on these methods and the lifetime of the registered services see Service lifetimes below.


public class Startup{


    public IConfiguration Configuration { get; }


    public Startup(IConfiguration configuration)

    {

        Configuration = configuration;
    }


    public void ConfigureServices(IServiceCollection services)
    {
        services.AddScoped<IMyServiceMyService>();      
    }
}


Step4: In your controller class you can inject MyService in the constructor and use it like below. 


 public class MyController : ControllerBase{

        private IMyService _myService;  

        public MyController(MyService _myService)
        {
            _myService = myService;
        }


        [HttpGet]
        [Route("/api/user")]
        public IActionResult Get()
        {
            _myService.GetMyUsers();
        }
 }

Using Service Extensions


You can call write your own service extensions services.Add{SERVICE_NAME} by extending the ServicesConfiguration class like below.


public static class ServicesConfiguration{


        public static void AddMyService(this IServiceCollection     services)

        {

            services.AddScoped<IMyServiceMyService>();      

        }

}


You can then use it in the Startup class like below.


public class Startup{


    public IConfiguration Configuration { get; }


    public Startup(IConfiguration configuration)

    {

        Configuration = configuration;
    }

    public void ConfigureServices(IServiceCollection services)
    {
        services.AddScoped<IMyServiceMyService>();      
    }
}


Service lifetimes


Transient

This is probably the default choice, its best suited for lightweight and stateless services. You can use this method in applications that don't implement a request-response pattern.

Scoped

This is best suited for web applications as it is created once per client request.


Singleton

This is created once for the life of the application. There is only one instance of this service. 


Tuesday, May 05, 2020

Part 2 : Using Jenkins to build .Net Core and NUnit


Run NUnit tests from Jenkins


This blog walks you through setting Jenkins up for hooking Nunit tests. 


Enable the MSTest plugin


In this step, you will learn how to install the MSTest plugin.
  • Once on the main page of Jenkin's you will need to navigate to Manage Jenkins in the left-hand navigation.
  • Then click on Manage Plugins like below.
  • Once on the main page of Jenkin's you will need to navigate to Manage Jenkins in the left-hand navigation.
  • Then click on Manage Plugins like below.
  • Then click on the Available tab.
  • Check the MSTest checkbox under .NET Development.
  • Scroll down and click on "Download now and install after restart".


Adding NUnit to project configuration


  • In your project go to Configure > Build 
  • Add a build step
  • In the dropdown scroll down to Execute Windows Batch Command
  • Ensure this step is placed after your MSBuild step
  • Add the following, replacing the variables with exact path to the files. 

dotnet test [fullpath]\NUnitTestApplication.dll --logger "trx;LogFileName=TestResults.trx"


Adding Post Build Test results 


  • In your project go to Configure.  
  • Add post-build action > Publish MSTest test result report. 
  • You can leave everything else as is like below.


Report 


You should now be able to see the results of your test like below 


Monday, May 04, 2020

The startegy pattern


The Strategy pattern defines a family of algorithms whose individual behaviours are encapsulated allowing them to be interchangeable. Strategy lets the algorithm vary independently from clients that use it. You can use this pattern to implement the Open/Close principle. 


Problem 


I'm building a digital wallet, users can choose the kind of encryption they need to protect their data with. Since the process of encrypting is the same. That is choosing their data, performing the encryption and storing it, we do not wish to duplicate the process for each new encryption type. Also, we want the flexibility to create new encryptions in the future and not affect the existing encrypted data. The Strategy Pattern can do just this.   

Analysis 


We need to be able to encapsulate the encryption algorithms and switch between them at runtime. Without the client being aware of the algorithms themselves. 

Solution 


First, we define an encryption interface IEncryption. We can now create different algorithms as the implementation of this interface. We now have three encryption classes class SHA1, class SHA256 and class SHA512 that implement the IEncryption interface. Then we create an Encryption Service class called EncryptionService that maintains the reference to the algorithms and decouples the client form the actual encryption classes. Alternatively, we could have substituted the interface with an Abstract class, this would allow us to define a default encryption to use.


Illustration 


Code


  public class Program
    {
        private static void Main(string[] args)
        {
            List encsvc = new List { new EncryptionService(new SHA1()), new EncryptionService(new SHA256()), new EncryptionService(new SHA512()) };

            foreach (var con in encsvc)
            {
                con.DoEncryption();
            }

            Console.ReadKey();
        }
    }


    public interface IEncryption

    {
        public void Encrypt();
    }


    public class SHA1 : IEncryption

    {
        public void Encrypt()
        {
            Console.WriteLine(
              "Encrypt using SHA1");
        }
    }

    internal class SHA256 : IEncryption

    {
        public void Encrypt()
        {
            Console.WriteLine(
              "Encrypt using SHA256");
        }
    }

    internal class SHA512 : IEncryption

    {
        public void Encrypt()
        {
            Console.WriteLine(
              "Encrypt using SHA512");
        }
    }

    internal class EncryptionService

    {
        private IEncryption encryption;


        public EncryptionService(IEncryption encryption)
        {
            this.encryption = encryption;
        }

        public void DoEncryption()
        {
            encryption.Encrypt();
        }
    }
}

Sunday, May 03, 2020

The command pattern


Encapsulate a request as an object, thereby allowing for the parameterization of clients with different requests and the queuing or logging of requests. It also allows for the support of undoable operations.


Problem

I'm building a digital game called War Tank, where the tank is capable of performing certain activities such as moving, firing and loading. These activities may be in a sequence, repetitive or reversed. The real-world implementation of this will result in a lot of code and complexity. But wait there's a Command pattern for this. 

Analysis 

We need to be able to encapsulate activities such as moving, loading and firing as objects. This would make issuing commands easy, by creating collections of commands that can be executed in any order.  

Solution 

Let's encapsulate each activity in a class of its own, now we have a MoveActivity class, LoadActivity class and FireActivity class. We create a layer of abstraction by inheriting these classes form a common abstract class called Activity.  Now we build our Tank class that's capable of executing these activities with a method called Action. The Action method can execute any Activity. The last thing we need is a TankCommander class that can invoke activities on a Tank. The TankCommander class binds the Tank to the Activities. 


Illustration


Code


    public class Program

    {

        static void Main()
        {
            Tank tank = new Tank();
            List Seq1 = new List {
                new LoadActivity(tank),
                new FireActivity(tank),
                new MoveActivity(tank)
            };

            TankCommander  tankCommander = new TankCommander();
            foreach (var command in Seq1)
            {  
                tankCommander.SetCommand(command);
                tankCommander.ExecuteCommand();
            }
            Console.ReadKey();
        }
    }
     
    public abstract class Activity
    {
        protected Tank battleVehicle;        
        public Activity(Tank battleVehicle)
        {
            this.battleVehicle = battleVehicle;
        }
        public abstract void Execute();
    }

    public class MoveActivity : Activity
    {
        public MoveActivity(Tank battleVehicle) :
          base(battleVehicle){}

        public override void Execute()
        {
            battleVehicle.Action("Moving Tank");
        }
    }

    public class LoadActivity : Activity
    {
        public LoadActivity(Tank battleVehicle) :
          base(battleVehicle){}

        public override void Execute()
        {
            battleVehicle.Action("Reloading guns");
        }
    }

    public class FireActivity : Activity
    { 
        public FireActivity(Tank battleVehicle) :
          base(battleVehicle){}

        public override void Execute()
        {
            battleVehicle.Action("Firing guns");
        }
    }

    public class Tank
    {
        public void Action(string _action)
        {
            Console.WriteLine(_action);
        }
    }
    public class TankCommander
    {
        private Activity command;

        public void SetCommand(Activity command)
        {
            this.command = command;
        }

        public void ExecuteCommand()
        {
            command.Execute();
        }
    }

Wednesday, April 29, 2020

Part 1 : Using Jenkins to build .Net Core Solutions/Projects


This is a walk through on how to setup a Jenkins project to build a .Net Core application on a windows 10 machine. The .Net code has its source code stored on  GitHub.

Install and setup Jenkins on windows 10

In this step you will download, install and setup Jenkins on your Win 10 operating system.

  1. Download Jenkins by going to this url
    https://www.jenkins.io/download/ then scroll down to the  below table and click on windows.

  2. You should have a zip file like below. After downloading it, unzip it and follow the installation prompts. This is pretty straight forward.

  3. Once the setup is complete you can load it in your browser by going to this url below.

    http://localhost:8080/
  4. You will be presented with a login screen and you will need the initial admin password. You can find this in your Jenkins installation folder. Look for the initialAdminPassword in the secrets folder like below.

    C:\Program Files (x86)\Jenkins\secrets\initialAdminPassword
  5. Once you have signed into Jenkins you can change your password. Strongly recommend you do that as a security precaution. 

Adding Plugins


In this step you will learn how to install the MSBuild plugin and configure the plugin.

  1. Once on the main page of Jenkin's you will need to navigate to  Manage Jenkins in the left hand navigation. 
  2. Then click on Manage Plugins like below.


  3. Then click on the Available tab. 
  4. Check the MSBuild checkbox under .NET Development.

  5. Scroll down and click on "Download now and install after restart". 
  6. Click on Manage Jenkins in the left hand navigation. 
  7. Then click on Global Tool Configuration.

  8. Scroll down to MSBuild and click on Add MSBuild 
  9. Give it a name E.g. VSBuild. 
  10. Set the path to your MSBuild executable in the Path to MSBuild field. This will be located in the folder below if you have Visual studio installed. Alternatively you could download the .Net framework and locate the MSBuild executable path in the .Net installation folder. It's important to note that the MSBuild.exe is required even though there is a warning that its only expecting a folder path.C:\Program Files (x86)\Microsoft Visual Studio\2019\Community\MSBuild\Current\Bin\Msbuild.exe

  11. Scroll down and click Apply and Save

Creating your first Jenkins project

In this step you will learn how to setup a Jenkins project to build a .Net Core application.
  1. Click on the New Item in the  left hand navigation. 
  2. Enter an item name and select Freestyle project. 
  3. Scroll down and click OK. 
  4. Under Source Code Management choose GIT.


  5. Enter the GIT repo url in Repository URL. Based on the type of repository you may need to provide appropriate credentials. 
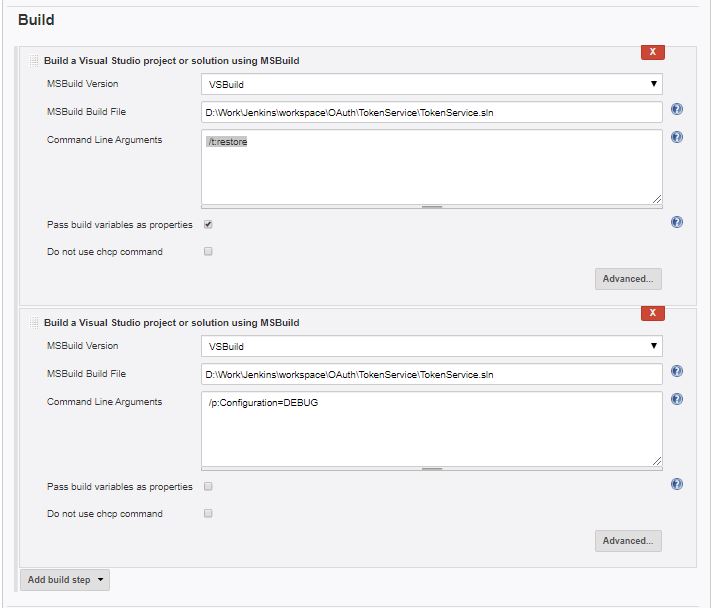
  6. Scroll down to Build and click on Add build step.
  7. Choose the MSBuild Version you setup in Jenkin setup above Choose the MSBuild Build File as a full path to the Solution/Project file.
  8. For Command Line Arguments add /p:Configuration=DEBUG or /p:Configuration=RELEASE depending on what you intend to build. 


** If you are not checking in the project assets like me. This is part of the .gitignore by default, you will need an additional
build step to restore them. 


  1. Click on Add build step.
  2. Choose the MSBuild Version you setup in Jenkin setup above.
  3. Choose the MSBuild Build File as a full path to the Solution/Project file.
  4. For Command Line Arguments add /t:restore.

Build your project

In this step you obtain Nirvana when you get to build your project.

  1. Click on the name of your project. 
  2. Then click on  Build Now in the left hand side.


  3. You should see your project build status now.


Tuesday, June 18, 2013

MVC Custom Model Binder

Recently I was looking at an unusual problem where we had to add custom fields to a view on an ad hoc basis. Not really a problem if it was an MVC app talking directly to a data source. But mine was over several REST based services that were talking to a CRM dynamics backend, spread across multiple domains. Which meant we had to change the data models through out the system. That's when it occurred to  me that we can have one dedicated field  that can store all the ad hoc field data using JASON or xml and we append it to one of the existing fields. Probably not the ideal solution, but that's when I came across custom binding for MVC. I would like to share with you how simple and easy it is to use custom binding to solve similar issues.

See here for more http://www.codeproject.com/Articles/605595/ASP-NET-MVC-Custom-Model-Binder?msg=4591496#xx4591496xx

Friday, February 10, 2012

The Adapter Pattern


The adapter pattern is used to match one interface with another. This is a useful pattern to use when implementing Interface Segregation Principles.

Problem  

I'm building a digital simulator called FarmAnimals that can build farm animals with many capabilities. Some of these capabilities I wish to implement on my own and for others Id like to use an external source like a library. I have found a library called ZooLib that offers animal capabilities that I'd like to use. But the ZooLib library classes implement an interface that is very different to the one implemented by my classes in FarmAnimals. Thankfully there's an Adapter pattern to  the rescue!

Analysis 

I've decided to create a Goat using my FarmAnimals application. FarmAnimals contains an Interface 
IFarmAnimal which defines a method called getDietaryType(). All animals need to eat is a given and so I expect all my animal classes to implement IFarmAnimal.

The ZooLib library has a useful function getFamily() that can help identify the family my animals belong to. I want to use  this feature in FarmAnimals. But my Goat class implements an IFarmAnimal interface and the getFamily which is part of the MountainGoat class in ZooAnimals implements an interface called IZooAnimals which is a completely different interface.

Solution 

Create an abstract base class called ZooAnimalAdapter that implements both interfaces. It delegates all my IFarmAnimal operations to the concrete subclasses in this case Goat and builds wrappers around the IFarmAnimal which are also available as part of my Goat class.

Code


Contents of the ZooLib library

public interface IZooAnimal
{
    void getFamily();
}

public class MountainGoat : IZooAnimal
{
    public void getFamily()
    {
        Console.WriteLine("Family : Bovidae");
    }
}

Contents of my FarmAnimal application

public interface IFarmAnimal
{
   void getDietaryType();
}


public abstract class ZooAnimalAdapter:IFarmAnimal,IZooAnimal
{
   public abstract void getDietaryType();
   public void getFamily()
   {
      IZooAnimal za = new MountainGoat();
      za.getFamily();
   }
}

public class Goat: ZooAnimalAdapter
{
   public void getDietaryType()
   {
      Console.WriteLine("Diet: Herbivor");
   }
}
public class Program
{
   static void Main(string[] args)
   {
       Goat g = new Goat();
       g.getFamily();
       g.getDietaryType();
       Console.ReadKey();
   }
}

Thursday, January 19, 2012

Design Patterns

Ive been saying to myself that I will set aside time, to write a tutorial on design patterns. I think that time has come and here is what I have come up with.

What are design patterns?

In the object oriented world the solutions/designs we create to overcome problems or requirements have probably been done before. Over time these solutions/designs have evolved into repeatable set of patterns. Some of these patterns have been identified and classified into one of the three types of design patterns.

However there is no hard and fast rules for these patterns and you might have already been using this patterns unconsciously. However there are a few patterns that are well documented and widely used. Even these patterns might have several variants and be customiz3d to solve specific problems.


What are the types of design patterns? How man are there in total?

There are three main types of design patterns. There are several design patterns and their variants in use, here are a few that have been well documented and frequently used.

Creational Patterns
Abstract Factory
Builder
Factory Method
Prototype
Singleton

Structural Patterns
Adapter
Bridge
Composite
Decorator
Facade
Flyweight
Proxy

Behavioral Patterns
Chain of Resp.
Command
Interpreter
Iterator
Mediator
Memento
Observer
State
Strategy
Template Method
Visitor

Why do we need design patterns? Are they really useful?

Design patterns help implement the object oriented concepts. They also provide us with a standard set of available and well researched solutions to familiar software design problems.

"Are they really useful" is a hard question to answer and also quite opinionated, but My understanding is Yes they are useful. My justification for this is, by implementing design patterns in the long run you will create code that is standardized and understandable by all. Further there is no point in re inventing the wheel, especially with less efficient code and designs.

How do I know when to apply which pattern?

Unfortunately like all things abstract, this is the hardest to master. We can only learn when to apply a certain design pattern from experience and prior learning. As mentioned before there is no limitations to the number of patterns. There are a number of variants of any given pattern and every solution would require some modifications to even a well defined pattern.

However one method I have used to learn "When to use a pattern" is by looking at code written by others. Try and identify what patterns they have used to solve a particular design problem, this is your best bet in learning when to use a particular design pattern.

Tuesday, April 05, 2011

Implementing WCF .Net 4 on the windows 2008 R2 server

I recently came across one of those annoying deployment issues when I deployed my WCF project to a windows 2008 R2 server.

After much googling and scratching my head till I could feel my scalp going raw, I figured out that WCF activation needs to be added as a feature through the Server Manager.

When I actually figured that part out I was caught on a another mind-boggling experience. .Net framework 4 was not available via the Server Manager. But I look at the WINDOWS\Microsoft.NET\Framework folder and there was .Net 4.
Anyhow I figured this out too, you need to have the Microsoft .NET Framework 4 (Standalone Installer) for Server Core

So things to watch out for

1) .Net 4 (Server Core) edition is installed on the windows 2008 server
2) Make sure that you add the feature WCF Activation is added to the server.