
Install and setup Jenkins on windows 10
In this step you will download, install and setup Jenkins
on your Win 10 operating system.
- Download Jenkins by going to this url
https://www.jenkins.io/download/ then scroll down to the below table and click on windows.
- You should have a zip file like below. After downloading it,
unzip it and follow the installation prompts. This is pretty straight forward.

- Once the setup is complete you can load it in your browser by going to this url below.
http://localhost:8080/ - You will be presented with a login screen and you will need the initial
admin password. You can find this in your Jenkins installation folder. Look for the initialAdminPassword
in the secrets folder like below.
C:\Program Files (x86)\Jenkins\secrets\initialAdminPassword - Once you have signed into Jenkins you can change your password. Strongly recommend you do that as a security precaution.

Adding Plugins
In this step you will learn how to install the MSBuild plugin and configure the plugin.
- Once on the main page of Jenkin's you will need to navigate to Manage Jenkins in the left hand navigation.
- Then click on Manage Plugins like below.

- Then click on the Available tab.
- Check the MSBuild checkbox under .NET Development.
- Scroll down and click on "Download now and install after restart".
- Click on Manage Jenkins in the left hand navigation.
- Then click on Global Tool Configuration.
- Scroll down to MSBuild and click on Add MSBuild
- Give it a name E.g. VSBuild.
- Set the path to your MSBuild executable in the Path to MSBuild field. This will be located in the folder below if you have Visual studio installed. Alternatively you could download the .Net framework and locate the MSBuild executable path in the .Net installation folder. It's important to note that the MSBuild.exe is required even though there is a warning that its only expecting a folder path.C:\Program Files (x86)\Microsoft Visual Studio\2019\Community\MSBuild\Current\Bin\Msbuild.exe
- Scroll down and click Apply and Save


Creating your first Jenkins project
In this step you will learn how to setup a Jenkins project to build a .Net Core application.
- Click on the New Item in the left hand navigation.
- Enter an item name and select Freestyle project.
- Scroll down and click OK.
- Under Source Code Management choose GIT.

- Enter the GIT repo url in Repository URL. Based on the type of repository you may need to provide appropriate credentials.
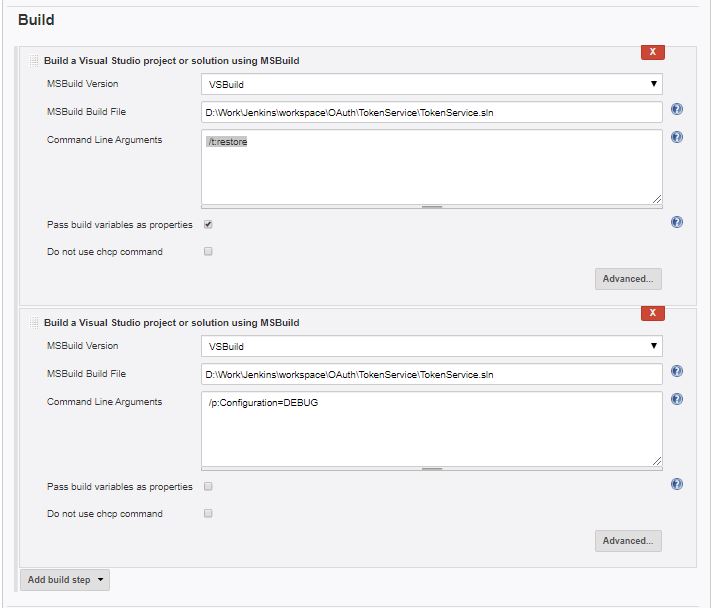
- Scroll down to Build and click on Add build step.
- Choose the MSBuild Version you setup in Jenkin setup above Choose the MSBuild Build File as a full path to the Solution/Project file.
- For Command Line Arguments add /p:Configuration=DEBUG or /p:Configuration=RELEASE depending on what you intend to build.


** If you are not checking in the project assets like me. This is part of the .gitignore by default, you will need an additional
build step to restore them.
build step to restore them.
- Click on Add build step.
- Choose the MSBuild Version you setup in Jenkin setup above.
- Choose the MSBuild Build File as a full path to the Solution/Project file.
- For Command Line Arguments add /t:restore.
Build your project
In this step you obtain Nirvana when you get to build your project.
- Click on the name of your project.
- Then click on Build Now in the left hand side.

- You should see your project build status now.


1 comment:
Nice article Ritesh!!
Post a Comment